- 您現(xiàn)在的位置:買賣IC網(wǎng) > PDF目錄353166 > HD6432236BWXXXTE IC MCU ARM7 32KB FLASH 64LQFP PDF資料下載
參數(shù)資料
| 型號: | HD6432236BWXXXTE |
| 英文描述: | IC MCU ARM7 32KB FLASH 64LQFP |
| 中文描述: | 微控制器 |
| 文件頁數(shù): | 7/67頁 |
| 文件大小: | 382K |
| 代理商: | HD6432236BWXXXTE |
第1頁第2頁第3頁第4頁第5頁第6頁當(dāng)前第7頁第8頁第9頁第10頁第11頁第12頁第13頁第14頁第15頁第16頁第17頁第18頁第19頁第20頁第21頁第22頁第23頁第24頁第25頁第26頁第27頁第28頁第29頁第30頁第31頁第32頁第33頁第34頁第35頁第36頁第37頁第38頁第39頁第40頁第41頁第42頁第43頁第44頁第45頁第46頁第47頁第48頁第49頁第50頁第51頁第52頁第53頁第54頁第55頁第56頁第57頁第58頁第59頁第60頁第61頁第62頁第63頁第64頁第65頁第66頁第67頁

Rev. 2.0, 03/06/02, 6
1.3
Creating a New Workspace
To create a new workspace:
1. Select the “Create a new project workspace” option from the “Welcome!” dialog (figure 1.6) and press
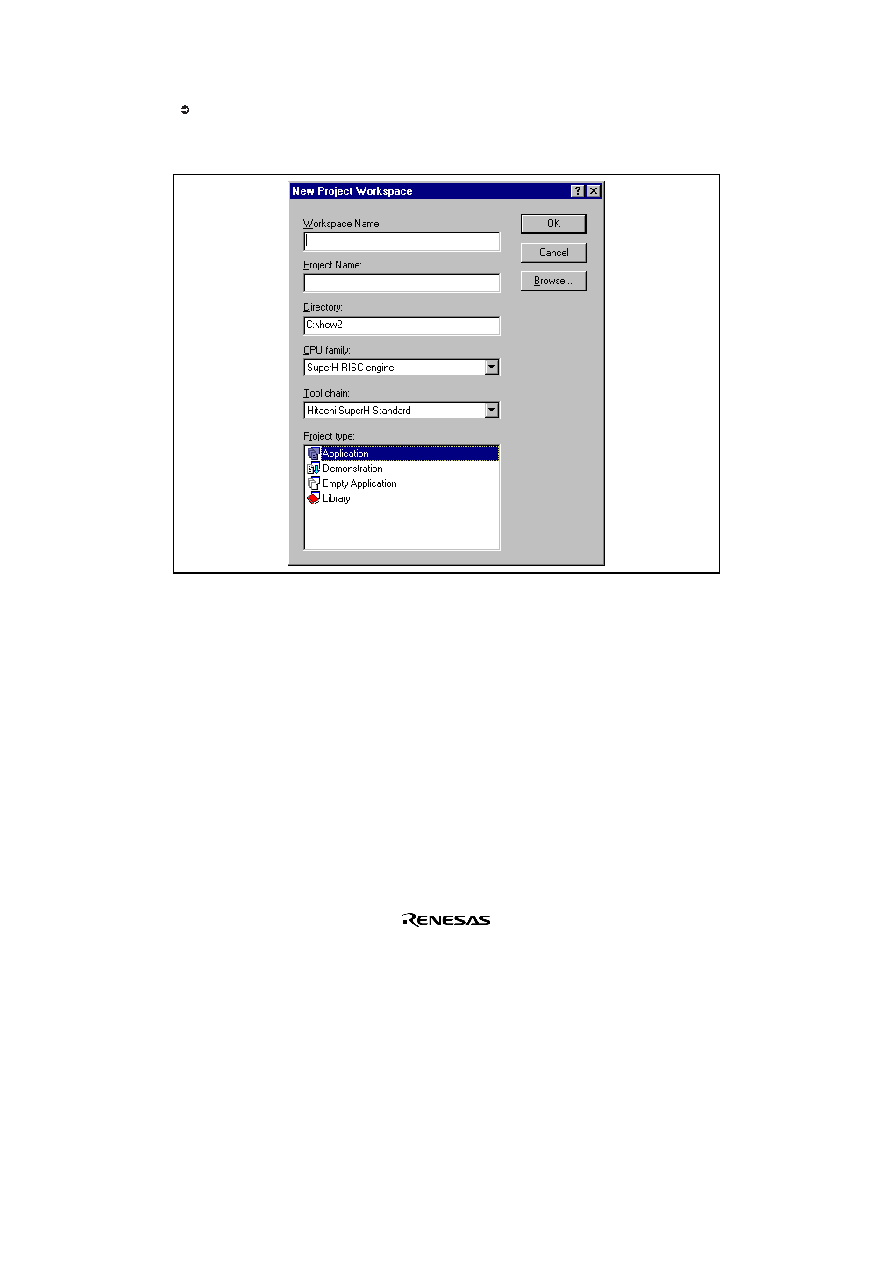
“OK” or select [File->New Workspace...]. The “New Project Workspace” dialog will be displayed
(figure 1.7).
Figure 1.7: New Project Workspace Dialog
2. Enter the name of the new workspace into the “Workspace Name” field. This can be up to 32 characters
in length and contain letters, numbers and the underscore character. As you enter the workspace name the
HEW will add a subdirectory and project name for you automatically. This can be changed if desired.
This allows the workspace and project name to be different. Use the “Browse…” button to graphically
select the directory in which you would like to create the workspace. Alternatively, you can type the
directory into the “Directory” field manually.
3. Select the CPU family and tool chain upon which you would like to base the workspace. Note that this
cannot be changed once the workspace has been created.
4. When a new workspace is created, HEW will also create a project with the name specified in the project
name field and place it inside the new workspace automatically. The “Project type” list displays all of the
available project types (e.g. application, library etc.). Select the type of project that you want to create
from this list. The project types displayed will be all valid types for the current CPU family and tool
chain pair.
5. Click “OK” to create the new workspace and project.
Note:
It is not possible to create a workspace if one already exists in the same directory.
相關(guān)PDF資料 |
PDF描述 |
|---|---|
| HD6432236BWXXXTF | Microcontroller |
| HD6432236BXXXF | Microcontroller |
| HD6432236BXXXFA | Microcontroller |
| HD6432236BXXXTE | Microcontroller |
| HD6432236BXXXTF | Microcontroller |
相關(guān)代理商/技術(shù)參數(shù) |
參數(shù)描述 |
|---|---|
| HD6432236BWXXXTF | 制造商:未知廠家 制造商全稱:未知廠家 功能描述:Microcontroller |
| HD6432236BXXXF | 制造商:未知廠家 制造商全稱:未知廠家 功能描述:Microcontroller |
| HD6432236BXXXFA | 制造商:未知廠家 制造商全稱:未知廠家 功能描述:Microcontroller |
| HD6432236BXXXTE | 制造商:未知廠家 制造商全稱:未知廠家 功能描述:Microcontroller |
| HD6432236BXXXTF | 制造商:未知廠家 制造商全稱:未知廠家 功能描述:Microcontroller |
發(fā)布緊急采購,3分鐘左右您將得到回復(fù)。